
How to Install a Dryer Vent (And Other Important Dryer Maintenance Tasks)
As a homeowner, there are certain projects that you must complete each year that will keep your house running smoothly and safely. One of these things is making sure that your dryer and dryer vents are working properly and are kept clean and clear of obstructions. You should really add dryer vent cleaning to your routine home cleaning schedule, if it’s not there already. They should be inspected and cleaned once or twice every year.
In this guide we are going to cover several important topics having to do with maintaining your dryer and ventilation system, including:
- How to install an exterior dryer wall vent
- How to clean and maintain your dryer ventilation duct system
- Tips for maintaining your dryer safely and effectively
Installing Dryer Wall Vent
If you’ve recently moved into a new home or haven’t changed out your exterior wall vent in a long time, then you may want to check it out right away in order to see if it is clogged, dirty, or failing in some way. Improperly maintained dryer vents and ducts are one of the leading causes of house fires in the United States and however tragic are entirely preventable as long as you stick to a regular maintenance schedule.
One of the most common reasons for installing a dryer wall vent is to replace an old or worn vent or to install the vent in a completely different part of the home due to a remodel or change in layout. Many homeowners will change the location of their washer and dryer during the course of their home’s history and this necessitates the creation and installation of a new venting system. Or, in new construction homes, this can be done after major construction has been completed as appliances are placed and installed. This can be done relatively quickly and easily if you have the right tools. Here’s what we recommend:
- Safety glasses
- Work gloves
- Power drill
- A four and one eighth inch (4-1/8 in) hole saw attachment
- Tip: make sure you measure the diameter of your dryer vent pipe before cutting. The most common diameter is four inches, but yours may be different. After you have measured, make sure that your hole saw attachment is at least an eighth of an inch larger than the duct because you will want a little room to maneuver.
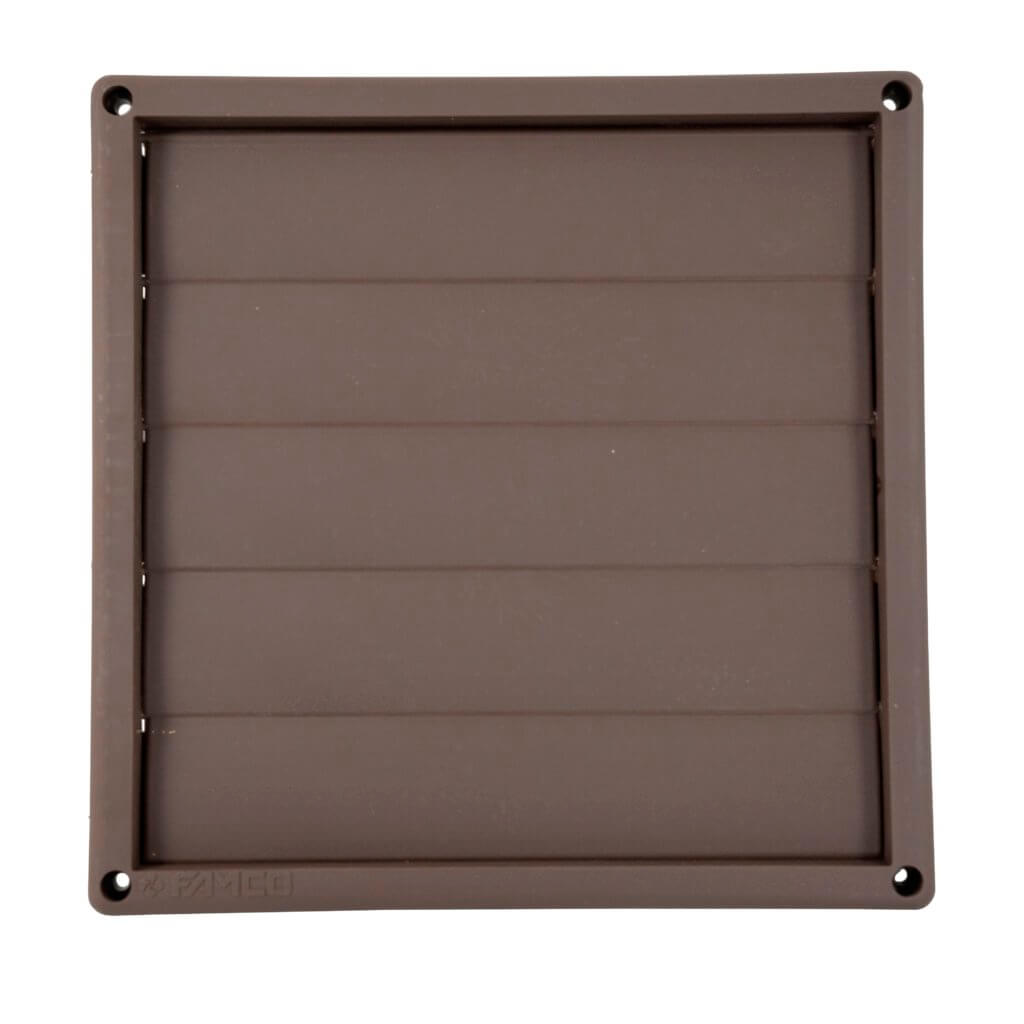
- Exterior wall vent. This plastic wall vent with movable louvers from our store will do nicely. (Bonus: You can also pair this with an ultra durable plastic wall vent guard that snaps on easily and helps keep critters out).
- Level
- Six to eight inch masonry drill bit (or wood drill bit in a pinch)
- Tape measure
- Electronic stud finder
- Four wood screws (2 to 2 and a half inches long)
- Screwdriver (or screwdriver bit for your drill)
- Calking gun and tube of all weather calk
- Ladder (if vent will be installed in 2nd story laundry room area)
Let’s Get Started
First, after you have gathered your basic materials and put on your safety glasses and gloves, you’ll want to measure your duct diameter. It should be four inches, but it helps to make sure. Next, you’ll want to determine where you will want to cut your hole into your home’s wall in order to feed the vent to the outside. In your laundry room, use your stud finder and lightly mark the location of the studs on your interior wall about one foot off the floor. Make sure that you cut your hole to the outside safely between studs and away from any electrical wiring that may be in the area. Look at where your dryer plugs into the wall outlet. Be careful not to cut directly below or close to where the wiring feeds into that outlet.
Drill Your Pilot Hole
Attach the masonry bit to your drill and drill a hole that goes all the way through the entire wall to the outside of your home. This hole will allow you to safely and accurately guide your hole saw in a straight line as you cut through your wall.
First Cut: Interior
Attach the four and one eighth inch hole saw attachment to your power drill. Make sure it is firmly attached to prevent wobbling or any unsafe uncoupling during the cutting process. Insert the guide end of the saw into your pilot hole. Start cutting the hole carefully, making sure to watch for splashback from debris and drywall dust that may be thrown loose during the cutting process. This is why safety glasses are very important. You may also want to put on a dust mask as well. Pause and check your hole saw periodically during the cut. You may have to remove small discs of wall material that get trapped in the interior of the bit as you cut. Be careful that the blades don’t get to hot as well. Once you have cut half way between the inside and the outside of your home’s wall, pause and take your drill around to the exterior.
Second Cut: Exterior
It’s important to cut from both sides of your home’s wall during installation. Even though you could easily just cut the hole from one side you will want to cut from both sides in order to make sure that the openings of each end of the hole are neat and tidy and not torn up and shredded looking.
Quick Tip: If your house has vinyl siding start your hole saw in reverse to score a light outline of your saw’s blade. This way, once you start cutting it will grip and cut into the slick vinyl surface more easily.
Using the pilot hole as your guide, insert the hole saw and carefully start cutting your way back into the interior of the wall to the halfway point you cut previously. Keep an eye on the saw blade to make sure it isn’t overheating.
Clean And Inspect Duct Hole
Once you have successfully cut your duct hole, you’ll want to inspect it to make sure that there are not any pieces of hanging debris or materials like insulation or drywall chunks that may interfere with you inserting the duct pipe. You may want to get a shop vac and quickly clean out the immediate area in and around the hole. It’s good to start with a clean installation area.
Install Dryer Vent
Using the FAMCO plastic wall vent with movable louvers, firmly slide the vent’s back end around the terminal end of your home’s dryer ventilation duct on the exterior of your house. Using your screwdriver or screwdriver bit on your drill, sink your four wood screws into each corner of the vent. There will be a hole for each screw to go through. Once securely attached, take your calking gun and silicone based sealing calk and draw a line around the entire outside edge of the vent. Carefully follow around each corner to ensure there are no gaps in coverage. Inspect and then add any extra calk as necessary to fully seal around the vent area. If you bought the optional plastic wall vent guard, then now is the time to snap it on to the outside of the vent.
Congratulations! You have successfully installed a new dryer vent to your home.
Tips For Maintaining Your Dryer And Dryer Ducts
A good dryer can be the heart and soul of your home. It can help your clothes stay soft and feeling fresh for years at a time and turns the age old chore of drying clothes on a line for hours at a time into something that can be done in just minutes. But, if you don’t maintain your dryer and the ventilation ducts carefully, it could lead to poor dryer performance and even a fire. According to FEMA, over 2,900 homes catch fire in America every year due to preventable dryer fires. These fires cause an estimated 5 deaths and 100 injuries and over $35 million dollars in property loss. Failure to clean out a dryer vent system is the number one reason for these fires.
Here are some things you can do today to help make sure that your dryer is properly venting and that your lint isn’t building up to a dangerous level.
Clean Dryness Sensors
A simple task that can save you money and time each year is to clean your dryer’s dryness sensors. These are usually located near and under the door on the inside of the drum. Take a cotton ball or small rag and douse it with isopropyl alcohol. Firmly apply pressure and rub the sensor bar until all of the buildup and lint is removed. While you’re in there, take the rag and quickly wipe down the inside of your dryer’s drum. This can help to remove unwanted lint and dryer sheet residue buildup and will help your dryer run more efficiently. A clean dryness sensor can help your dryer work better and will save you money on electricity so that your dryer can stop when it detects that your clothes are dry enough.
Remove Lint From Lint Trap Every Cycle
Just make it part of your daily drying routine. Check the trap before starting your dryer cycle to make sure that it is clean and clear of lint. Every three months or so you’ll want to take the lint trap and actually wash it with warm water and dish soap. This is because lint and dryer sheets can leave a residue on the trap that can build up over time and decrease its efficiency and could lead to a fire or pressure build up as air is forced past the ever more clogged vent. Let the lint trap air dry for a few hours before reinserting into the appliance. Also, if your filter has any cracks or holes in the screen, it is time to replace it with a new one. Holes in your lint trap can lead to an unsafe buildup of lint in your ducts!
Clean Your Lint Screen Housing
About twice a year, you’ll want to remove your dryer’s lint screen trap and insert a shop vac tube into the hole. Some vacuums will have an attachment that is narrow enough to fit but you may want to buy one that is specially suited to the task. Make sure that you vacuum the area really well in order to remove any unwanted buildup. Replace your lint trap when you’re done.
Check Your Outside Vent
At least once a year, you’ll want to manually inspect your exterior vent. Check for cracks, leaks, or signs of bugs or small animals trying to enter the house through the vent. They can be attracted to that area because it is a source of warmth during cold months. Clear away any debris or buildup and make sure that your vent’s louvres are properly functioning as they help keep air from gusting back up into your dryer’s ventilation ducts. If your vent is visibly damaged or worn, it may be time to replace it and install a new one. FAMCO has several options for you to choose from that would be perfect for a quick DIY home improvement project.
Clean The Exterior Vent Duct Area
While inspecting your vent cap, carefully remove it from the exterior of your house. Take a long handled brush and insert it into the vent. Pull it out several times to grab any trapped lint. Insert your vacuum attachment and vacuum up the area immediately around the vent opening and a few inches to a foot behind to get as much lint as possible. Wipe down with a clean cloth and reattach your exterior vent. You may need to re-calk the seal so it is properly keeping moisture and critters out.
Clean The Duct Area Directly Behind Your Dryer
Even though you are very diligent about cleaning your lint trap, you may still get a buildup of lint behind your dryer unit where it connects to the ventilation pipe at the bottom rear of your dryer. Unplug your dryer and carefully move it away from the wall without putting too much tension on the duct housing. Reach in with a screwdriver and loosen the vent clamp to free the dryer from the duct in the wall. Inspect the vent that leads out of the back of your dryer. Clean out any lint and other debris as you see it. Insert a vent brush into the vent area connected to the wall. Clean that out as well as possible and then take your shop vac or house vac and briefly vacuum the inside to catch anything left behind by the brush. Reattach your dryer to the duct. Inspect the duct for any signs of leaks or cracks. You may have to replace the tube or patch it with some heavy duty foil backed tape.
Some homeowners take note: If your dryer vent system runs through your attic, this may be a tougher job than usual. Some homes have dryer vent systems that go from the laundry room straight up into the attic and then into the outside wall. If this is the case in your home, then a specialized rotary vent cleaning unit like a LintEater should be used. It can be easily put together and attached to a power drill. This is a good alternative cleaning method if your house is set up in this way. You also may want to consider hiring a professional CSIA certified dryer exhaust technician in your area. If at any point during the process of cleaning your dryer ducts you feel that you are out of your element or that the task is too big for you to tackle, the best thing you can do is to contact a professional so that they can take care of it for you properly. This is a matter that can cause a serious house fire if left done improperly. You never want to leave something like that to chance!
Clean The Back Of Your Dryer
While you’re down there cleaning out the tubes that directly connect to your dryer, take a moment to use the vacuum to clean out the back of your dryer cabinet. This should be done once or twice a year as well. It also wouldn’t hurt to clean out any lint or fallen clothes that may have been trapped under your dryer. You never know, you may find a treasure trove of lost socks and loose change down there!
Inspect Your Duct System
One important aspect of a well running dryer vent system is making sure that your dryer vent pipes are not leaking and are properly sealed at junctions. Visually inspect your piping system from the point it leaves your dryer to where it terminates at the wall to the outside. Turn your dryer on and let it run while you inspect. Do you hear any whistling in the duct system area? That could be a sign of an air leak. Look for dripping water or other signs of moisture buildup. This is another sign of a damaged or worn pipe that might need to be replaced.
Your pipes should be at a slight slope from where they start at your dryer area to where they exit the house. If you notice any sagging or improperly angled areas of the ducts, that will need to be righted. You should see a smooth angle leading all the way outside so that moisture and lint does not get caught up and trapped inside the ducts. If you have to replace your duct sections, never replace with vinyl or plastic venting. Always use metal and never use screws to secure connections. Just use heavy duty foil backed tape. If you screw into the dryer duct system it creates an area for lint to get trapped and build up on. This can lead to huge issues in the future.
As you’re inspecting your duct work look for any dented or crushed areas of duct. These will need to be replaced as they are potential build up points for lint and even moisture. As you replace them, make sure that they are straight and secure as possible. You’ll want to inspect these areas again about once every two years. A good time to do it is around Christmas time as you are bringing decorations up from the basement.
Pay Attention To Your Dryer
While it is good to set a few days each year in your calendar for cleaning and inspection of your dryer ducts, you will want to pay close attention to your dryer’s behavior. If you notice that it is running hotter, or more loudly, then you may have a lint buildup issue or sometimes a mechanical issue. If you notice that your clothes are taking longer and longer to dry, then you should take an afternoon and clean everything around your dryer from top to bottom, including taking a look at the exterior exhaust area. Taking longer and longer to dry is typically a sign of a lint buildup issue, but not always. It helps to inspect your ducts going out of your dryer and out of the house to make sure. If they appear to be clean and clear then you may have a mechanical issue with the dryer and it is time to troubleshoot that.
Thank you for taking the time to learn a little more about keeping your dryer and your dryer duct system clean and safe! If you ever have any questions about FAMCO products or installation, please don’t hesitate to reach out to us by phone at 1-800-234-1903. All FAMCO products are manufactured in the United States and come with a 1-year warranty against product defects and workmanship.